How to do Photoshop image retouching for an E-commerce website.
How to do Photoshop image retouching for an E-commerce website.
Having an e-commerce website means lots and lots of responsibility regarding sales, customers, visitations and therefore the most vital concerning product photography. Photographing a product is that the most difficult task because the photos square measure the sole supply for purchasers to look at the merchandise. The foremost fashionable and most suitable choice is to travel for product photography through models that superiority enhance your customers and merchandise sales by creating your website look skilled. Except for photographing a product with the assistance of models you have got to be terribly explicit concerning photo retouching techniques particularly skin retouching to be used on models to create them look excellent. If you want to remove unwanted object for beautifying your image background that time you need clipping path service. The easy basic that is followed is that the additional natural the higher. The concept behind this subject discussion is that retouching will create the merchandise look engaging and appealing to the client by removing their distraction. Take care whereas exploitation it as if you make it, it'll have negative impact on the merchandise image. To guide you within the right direction let’s begin with the step by step method of retouching exploitation adobe Photoshop as your ideal software system. These steps can assist you in leveling the skin tone, removing skin marking which will distract the purchasers, and additionally ensure that your product fits the model. This keeps your pictures look consistent and distraction free. Let begin with the steps.

Foremost we'll guide you relating to the skin tone that has to be balanced to
form the merchandise look best on the model. It is possible that your skin tone
does not match with your entire body or sometimes your arms and legs are not
matching with your upper body so to make the photos look consistent it is
necessary that you use the tool to balance the skin tone. By doing this you'll
in turn enhance your product customers because it ensures to allow distraction
free look of the merchandise to your customers. you'll provide best look to
your models only if you'll match the complete body components with the proper
skin tone that not solely ensures consistency however additionally eliminate
all the distractions. To allow this uniform skin tone to your model, simply
have a glance on these steps:
Steps are listed with the simplest tools to try and do this

Have you need clipping path service for remove your image background then Clipping Path EU is a best choice for this.
HUE AND SATURATION:
This is often the tool that you employ to regulate the hue of the skin elect. Follow the steps given below
Roughly choose the realm wherever you wish to alter the skin
tone.
Now add the adjustment hue/saturation layer to regulate the
color.
Repeat this to the complete body to form the skin tone
balanced. you'll add as several adjustment layers as in step with the body
components that required work. Check all body components like face, neck, legs,
feet etc. and provides them the uniform look.
1 CURVES TOOL:
Second tool to form the skin tone balanced is curve tool. It helps you by adjusting the darkness and brightness of the body. The steps are:
Firstly you've got to form overall choice of your model and
also the background on disguised out curves layer. This can additionally assist
you to link overall changes to that.
Now choose the body components which require brightening.
Refine the perimeters and so choose the curves adjustment that may produce new
adjustment layer. build your changes and shift to a different space.
The last step is to link the disguised adjustment to your
original mask.
2 REMOVAL OF SKIN
MARKINGS:
It is terribly necessary to get rid of all the skin marking of the model through writing. It should provide natural look thus detain mind that you just should take away all the bruises, cuts, blemishes that are quite distracting for the client. The simplest tools that are in use are:
It is terribly necessary to get rid of all the skin marking of the model through writing. It should provide natural look thus detain mind that you just should take away all the bruises, cuts, blemishes that are quite distracting for the client. The simplest tools that are in use are:
1 Dodge and burn:
This is often the tool that helps you to cut back the blotchiness and blackness from the skin of the model.
The steps are:
Start with creating and filling the empty layer with gray.
Now flip this layer to soft light-weight.
Use brush/burn round the space you wish to darken. You have
got to try and do this on the highest of the gray layer. You will lighten the
gray layer that is want of brightening by exploitation the choice key.
Push back and forth to dodge and burn as you're employed. You
will see your changes by turning on and off your gray layer. Bear in mind your
aim of obtaining desired look and still work till you get that.
2 Healing brush:
The second tool that you just will use for removing skin marking is healing brush. This tool can take away your blemishes, cuts, bumps and wrinkles on the hair and materials. Steps for exploitation it are:
Start with engaged on the duplicate layer
Now choose the realm you wish to figure on and hold the
choice on that. you'll choose that by clicking down.
When it gets amalgamated into the encompassing space, then
stop holding choice and brush.
Continue engaged on the skin continuation a similar that's
choosing and brushing.
3 PRODUCT FITS THE MODEL:
The foremost vital factor that you just have to be compelled to take into account is that your product should work the model in order that it's nice within the image. Dose not worry if the merchandise isn't of correct work of the model then you'll be intimate with the assistance of writing. I will mention you the simplest tools for it and with correct steps.
1 liquify tool: the steps you for exploitation this tool
are:
Duplicate your image background
Now choose the body and liquify tool.
Take the assistance of brush to dodge the components of the
body and adjusts the comb size consequently.
Make sure that you just don't move any components of the
image when you accomplish your job. To bring back your original image hold the
command and brushing over the realm.
Click OK and you'll see the results.
Conclusion:
Thus these are the 3 retouching necessities that you just have to be compelled to perform. Simply ensure to follow showing wisdom the mentioned steps.Clipping Path EU Ltd provide best quality photo retouching service provider at affordable.
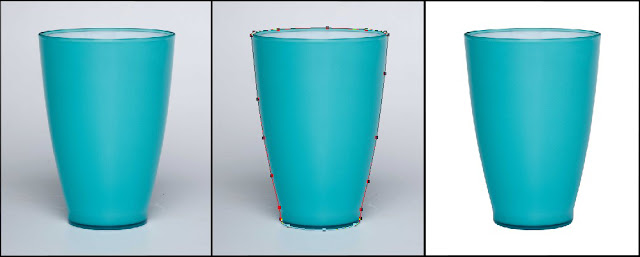
Image retouching and color correction are the newest addition in the digital photography. Various techniques and methods have been applied in Image retouching and color correction process nowadays then the previous time. Clipping Path service
ReplyDelete